CI/CD with Kubernetes and Otomi

In this article, we’ll explore some of the CI/CD capabilities Otomi has to offer. Note that the setup used in this article is only one of the multiple scenario’s. Otomi supports activating only the required capabilities for your use case in a composable way.

What is CI/CD

Continuous integration (CI) is a practice that involves building applications in a reliable and repeatable way. CI helps streamline code changes, thereby increasing time for developers to make changes and contribute to improved software.

Continuous delivery (CD) is the automated delivery of completed code to environments like development and testing. CD provides an automated and consistent way for code to be delivered to these environments.

CI results in an artefact (an image) and CD delivers the artefact to a runtime environment (Kubernetes).

How Otomi supports CI/CD

Otomi offers a complete self-hosted DevOps Platform as a Service for Kubernetes and includes all the required CI/CD capabilities. From storing your code in a Git repo, building images, pushing images to a private registry, deploying images, and providing all the runtime capabilities needed to run apps securely. And all of this without using any SaaS services. The only requirement is to have a Vanilla Kubernetes cluster up and running and install Otomi using Helm on your cluster.

In this article, we’ll explore some of the CI/CD capabilities Otomi has to offer. Note that the setup used in this article is only one of the multiple scenario’s. Otomi supports activating only the required capabilities for your use case in a composable way.

Getting started

We’ll start with installing Otomi on an Azure Kubernetes Service (AKS) cluster with DNS and Let’s Encrypt certificates.

You can also install Otomi without DNS. In that case, Otomi will use nip.io for hostnames and generate a custom CA to sign all the certificates. But the CA needs to be added to the cluster worker nodes and this is not done automatic by Otomi on all providers. So the preferred way is to use DNS with a custom CA or with Let’s Encrypt.

Installing Otomi

See otomi.io for Otomi installation instructions. In this post we’re installing Otomi using the Helm chart:


 helm repo add otomi https://otomi.io/otomi-core
 helm repo update
 helm install -f values.yaml otomi otomi/otomi

with the following values:


cluster:
  k8sVersion: "1.23"
  name: demo
  provider: azure
  domainSuffix: demo.aks.r6s.io # required for DNS
otomi:
  hasExternalDNS: true # required for DNS
dns:
  domainFilters:
    - aks.r6s.io
  provider:
    aws:
      credentials:
        secretKey: xxxxxxx
        accessKey: xxxxxxx
      region: eu-central-1
apps:
  cert-manager:
    issuer: letsencrypt
    stage: production
    email: sre@r6s.io

Yes, where installing Otomi on AKS, but we’re using a DNS (Route53) zone in AWS. Otomi has been setup to do everything multi- and hybrid cloud.

When the installer job has finished, follow the activation steps as described here.

Activating the needed DevOps capabilities

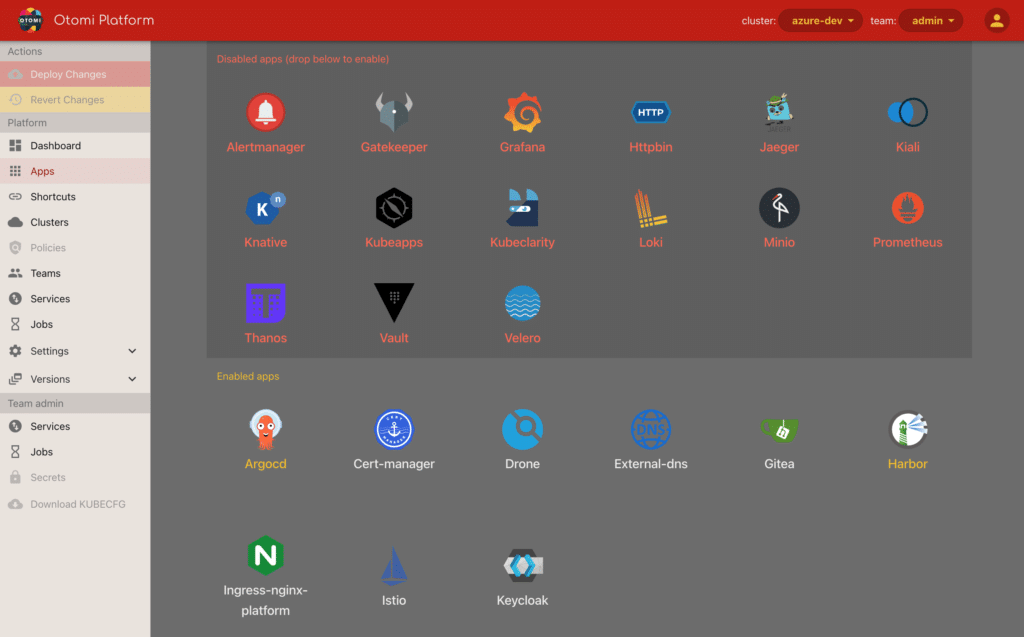
When Otomi is installed, only the core capabilities (using Keycloak, Istio, cert-manager, external-dns, Drone, and Gitea) are enabled. All the other capabilities are optional. This makes Otomi a composable platform. Let’s first activate all the capabilities we’re going to use. Activate the following apps by dragging them to the active apps plane:

  • Harbor for the private image registry capability
  • ArgoCD for the GitOps capability

And now click on ‘Deploy changes’.

webinar

Secondly, we’ll create a Team in Otomi. A Team in Otomi is a namespace in Kubernetes but also offers delegation of self-service features to team members. We’ll not go into this here, but remember that you’ll always need at least one team to be able to deploy apps.

Now that Harbor and ArgoCD are enabled and the Team has been created, everything on the platform is ready to build, deploy and run containerized apps. So let’s get started and create a code repository first.

Creating a Git repository

Open Gitea and create a new repository. Provide a name for the repo and make sure the repository is Private.

  1. Open Gitea
  2. Select the Otomi organisation
  3. On the right, click on ‘New Repository
  4. Provide a name (team-demo-helloworld)
  5. Click on Create Repository

For this article, We’ll be using a sample NodeJS hello-world application. Clone the sample repo:


git clone https://github.com/redkubes/nodejs-helloworld.git
cd nodejs-helloworld

And mirror the sample repo to the new Gitea repository:


git push --mirror https://gitea.demo.aks.r6s.io/team-demo-helloworld.git

Now clone the repository:


git clone https://gitea.demo.aks.r6s.io/team-demo-helloworld.git

Creating push credentials

Because we are going to be building an image from code and then push it to a private registry, we’ll first need to create credentials for pushing images to the registry. Open Harbor and create a new robot account for team demo:

  1. Click on Robot accounts
  2. Click New Robot account
  3. Name: team-demo-push
  4. Select team-demo
  5. Copy the Name and the Token

Configure a build pipeline

Drone CI is used by Otomi itself, but can also be used for your own projects. Open Drone, go to the Drone dashboard, and click on ‘SYNC’. You will see your new repo pop up in the REPOSITORIES list. Click on the new repo and then click ‘ACTIVATE’.

Now we’ll need to add the credentials of the robot account as secrets to Drone. In Drone:

  1. Click on the team-demo-app repository.
  2. Under Settings, Click on secrets
  3. Add the following 2 secrets:

REGISTRY_USERNAME = otomi-team-demo-push
REGISTRY_PASSWORD = 


Now we are going to add the Drone pipeline definition to our repo. Replace the .drone.yml contents with the following:


kind: pipeline
type: kubernetes
name: default
steps:
  - name: build-push
    image: plugins/docker
    settings:
      registry: harbor.demo.aks.r6s.io
      repo: harbor.demo.aks.r6s.io/team-demo/hello-world
      username:
        from_secret: REGISTRY_USERNAME
      password:
        from_secret: REGISTRY_PASSWORD
      tags:
        - ${DRONE_BRANCH}

Adjust the registry and repo name in the .drone.yml file and the push the changes:


git add .
git commit -m “add drone pipeline”
git push

In Drone, you’ll see that the pipeline has automatically started building and then pushing the new image to the registry:

And in Harbor you’ll see the newly created registry:

Deploy the image

Now that the image is built, we can deploy it. Otomi offers multiple options for deployment. You can:

  1. Create your own Deployment and Service manifest and deploy them using ArgoCD
  2. Create a Helm chart, add the chart to the chart library in Harbor and deploy the chart using ArgoCD
  3. Create a Helm chart and add it to the teams ArgoCD code respository
  4. Enable Knative and add a Knative service manifest to the teams ArgoCD repository
  5. Coming soon: Let Otomi create a Helm chart for you and deploy the chart using ArgoCD
  6. Coming soon:  Let Otomi create a Knative service manifest for you

In this article, we’re going to create a Helm chart for the hello-world app and deploy it using ArgoCD

While you created the Git repository, you will probably have noticed that Otomi also created a Git repository for the team-demo. Go to the respository (called team-demo-argocd), and clone the repo:


git clone https://gitea.demo.aks.r6s.io/team-demo-argocd.git

In the root of the project, create a Helm chart


helm create hello-world

Change the following values of the chart:


image:
    repository: harbor.demo.aks.r6s.io/team-demo/hello-world
    tag: master

serviceAccount:
  name: default

And commit the changes:


git add .
git commit -m "change values"
git push

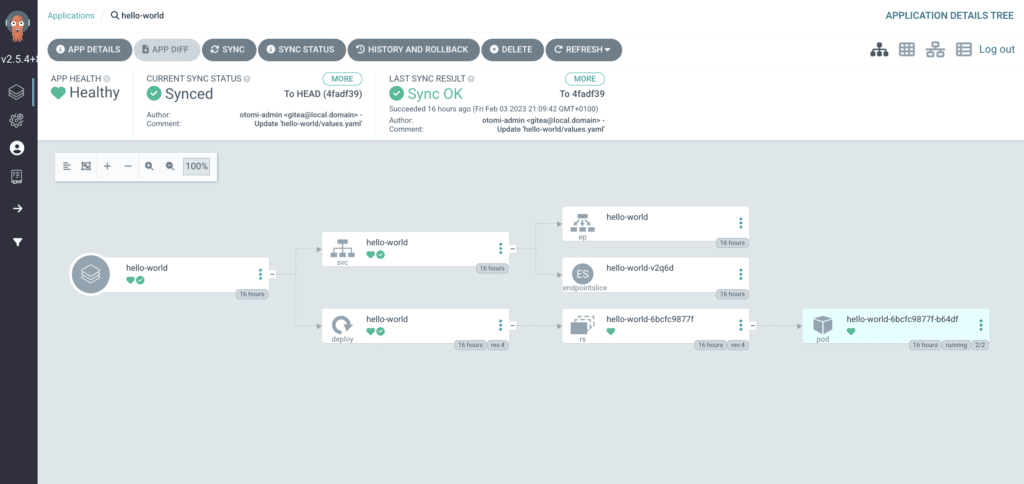
Now we’re going to deploy the chart using ArgoCD. Open ArgoCD, click on ‘+ NEW APP’ and fill in the following:

  • Application Name: hello-world
  • Project Name: team-demo
  • Sync policy: Automatic
  • Repository URL: https://gitea.demo.aks.r6s.io/team-demo-argocd.git
  • Path: hello-world
  • Cluster URL: https://kubernetes.default.svc
  • Namespace: team-demo

And click on ‘CREATE’

And click on ‘CREATE’. After a few seconds you’ll see the chart is synchronized and deployed:

argocd

Publicly expose the app

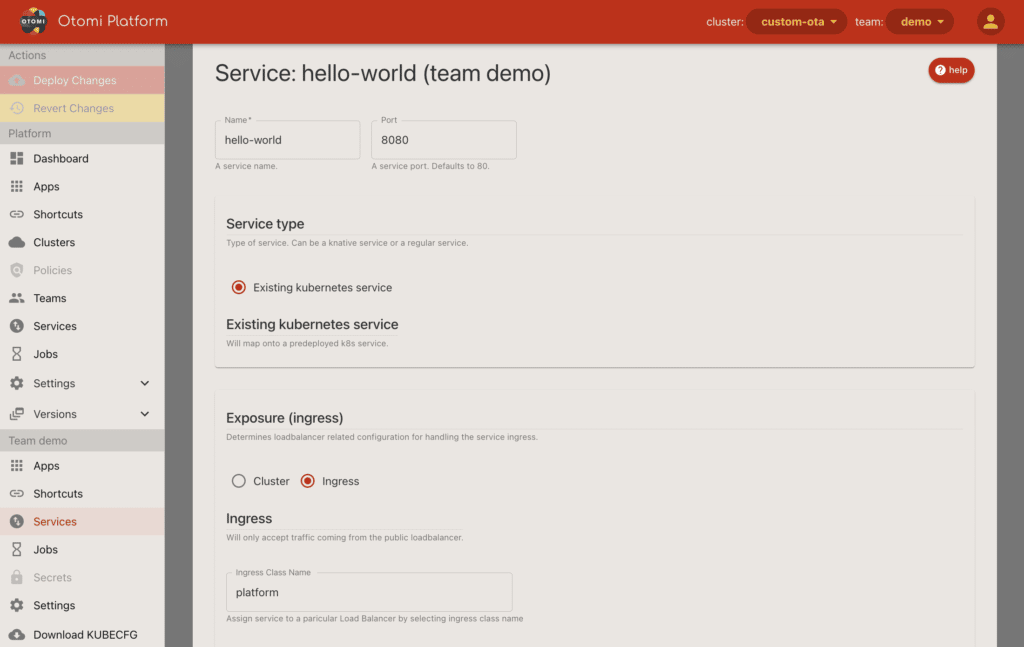
While the app is deployed, we can not access the app from outside the cluster. The next step is to expose the app publicly by configuring ingress for the service. Otomi comes with an advanced ingress architecture using Nginx Ingress Controllers and Istio. But you don’t need to create the configuration yourself. By using the Services option in Otomi, you can configure ingress with just a few clicks. Otomi will then generate all the required configuration. And all in a validated way, so you can’t make any mistakes. Let’s create a Service.

  1. Select the Demo team in the top bar of the web console
  2. In the left menu (under Team Demo) click on Services
  3. Click on New Service
  4. Fill in a name for the service (hello-world)
  5. Select Existing Kubernetes Service under Service Type
  6. Under Exposure Ingress, select Ingress and use the default configuration
  7. Click on Submit
  8. Click on Deploy Changes (the Deploy Changes button in the left panel will light-up after you click on submit)

Deploying changes in Otomi usually takes just a couple of minutes depending on the amount of resources available on your cluster. You will see your service in the list of Services. Click on the URL and see the application.

Wrapping up

In this article we demonstrated how to take advantage of some of the CI/CD capabilities Otomi has to offer:

  • Create GIT repo’s
  • Build images
  • Store images in a private registry
  • Deploy apps using ArgoCD

After getting access to a vanilla Kubernetes cluster with Otomi installed, you can have a full CI/CD setup within minutes. The CI/CD capabilities are supported by Gitea, Drone, Harbor and ArgoCD.

We understand that there are still a couple of things you’ll need to do manually, like creating a robot account for pushing images to harbor and creating the Helm chart. That’s why we’ll soon come with 2 new features:

  • Automatically create push credentials for teams
  • Automatically create a Helm chart for your app

So stay tuned for new updates and follow us on GitHub: https://github.com/redkubes/otomi-core


Latest Articles

Navigating the Evolution: Trends and Transformations in Kubernetes Platforms for 2024

Navigating the Evolution: Trends and Transformations in Kubernetes Platforms for 2024

As we look ahead to 2024, the excitement around building and managing container and Kubernetes platforms is shifting to a more realistic outlook. Companies are realizing that these tasks are more complex than originally thought. In the bigger picture, we can expect things to come together and simplify in the coming year. Let's break it down.

Read more
Mastering Dockerfile USER

Mastering Dockerfile USER

Mastering Dockerfile USER: The Key to seamless Kubernetes Deployment

Read more